Capturing player cities is more difficult then defending - they can side step Cleaning Crew Troops. they can get support. they can generally make it difficult. Which is half the fun!! Here are some tactics I've learned to wage war.
I scout repeatedly in between - but only because I hate surprises. I like to leave time to slip in an extra strike just before my first scholar hits,
If your prey is dodging troops - hide your troops in a fake ballistic attack. More on that HERE.
OK so you've found your Victim. First thing to do is launch a scout contingency.
So you scout them, and assess their strength, the example Victim has minimal defense troops for Calvary (Lancers), but is stocked up on Infantry Defense (Guardians).
If you are confident you can always launch your scholar train first, and send clearing waves timed to land just before your first scholar hits. This can be a gamble with the introduction of the purchasable "truce" option in the store, it is better to have your clearing crew in a city that is further away from your target and slow them down by adding one ram or one sentry to adjust the timing so your cc lands just before your train.
Note the Wall Level is maxed out at 25, You'll need to bring it down to prevent loss of troops. It is quite possible to capture a city completely intact, however for those of us who usually have a need for troops, rebuilding the wall after capture only takes a day or two, depending on how committed you are to it.
Also note at the bottom where he has 250 Lancers outside the city, this maybe support for a guild mate or maybe he is farming, or thinks that they can be brought back into the city just in time to kill your scholar. Make sure that when you simulate you add those units.
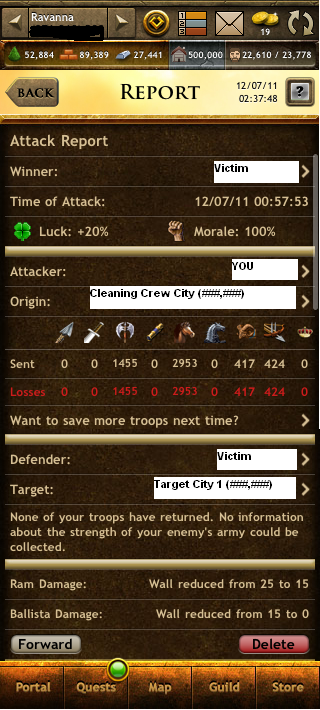
The purpose of a cleaning crew is to kill your victims' troops. Expect your men are to be sacrificed for the greater good of the kingdom, I usually send two waves, the first with Rams and Ballistas to Wall Break your victim and a second wave to mop up the carnage afterward.
Note that I did not send scouts with this wave, mainly because I knew that I would take down the wall completely, aiming my 424 Ballistas at the wall to accompany the rams bringing it to 0. I also knew that my Second CC Wave would be following this wave and I'd get a better picture once I got the report back on that.
A few things to note, first the time the second clearing crew landed. I timed it so that it would land within 15 minutes of my first attack.
Second, I sent Rams just in case he tried to rebuild his wall or purchased gold to rebuild his wall. I also needed to slow down this clearing crew, adding Rams slows it down considerably. I usually only add 1 Ram if I want to slow down my cc or if I want to disguise it as ballistas. Your victim will leave his troops in city if he thinks you're going to send ballistas to knock down his farm.
I always send MORE troops then actually needed, you collect serious looting, and you can never send too much. I effectively killed all his troops, and his wall is completely down, the path is paved for my scholar train.
Even though the path was clear, I sent a decent contingency to accompany my scholar. If he had a decent guild they would have sent support, and hopefully your first scholar hit lives. I send 4 in a train. This example is based on a 4 Train Cap. I recently got cocky and only sent 4 to cap a city that was a 11 hour walk and got burnt hard because even though my scholars landed within 7 to 10 minutes of one another, I only brought the loyalty down to 2. I had to wait for my scholars to return before I could send more out. LUCKILY I had three extra scholars in reserve so it wasn't that big of a deal, but still. Its better to be safe then sorry.
The more resources you can pull away from your Victim the less he'll be able to build to defend. This guy was clearly not logged on as there was nothing building in queue otherwise you'd see a hand full of whatever troops that is currently building.
Note that my scholar took off 28 loyalty points. Your scholar takes off between 20 - 30 points with each strike, and sending more then one scholar doesn't take off more loyalty, its just a waste. If you have two scholars built in one city, divide up your troops evenly between your two waves.
Note the time. This scholar land is from another of my cities, it landed within 10 minutes of my first scholar, I sent my defense troops to protect my scholar because I used my attack troops in my cleaning crew wave earlier.
Breaking your troops up like this is very effective, you can clear out the troops with your attack troops and protect your scholar easily with a few thousand defense troops. Note: Guardians are very versatile for this reason, they are great for attack and defense.
He still doesn't have any support, which is good for me :) but had he gotten some in between hopefully my contingency would be enough to keep my scholar alive.
My scholar brought the victim's loyalty down from 72 to 45. Because I landed the second scholar so soon after the first, no loyalty built back up between attacks so my scholar took off 27 loyalty points leaving them at 45.
I messed up this land by 10 minutes, because math isn't my strong suit apparently. It still only took 4 scholars to capture this city, so it worked out, but I've had small mistakes like that cost me a cap.
This is another city where I used the attack troops to hit the city then used the defense troops to accompany my scholar. I was confident in my troop count, and I also bet that he wouldn't have support.
The scholar took the loyalty down from 45 to 22 that's only 23 points.
Another really good haul resource wise, leaving him less and less to rebuild with. Clearly he is not doing this as no troops are being built. There's a really good chance that he is going to log into his city in the morning and whoops! Its gone :(
mwahhahahahahaa
I sent a wave in between the last scholar wave and this one to "sweep" the troops and make sure there were no surprises.
With my claiming scholar I sent Guardians which are a good accompaniment to your scholar. Had i had Bezerkers I would have sent them as well, but I sent them from this city as a sweep to clear out any support troops he could have had.
This final scholar took the loyalty down from 23 to 0 capturing the city as mine and effectively ruining your victim's morning.
That is it, basic capture in a nut shell. If you don't catch your victim while he's offline like in this example, there will be more back and forth, and your scholar death chance increases significantly.
A couple things I like to do to before I engage in war with someone is Ballista the warehouse of nearby barbarian cities. This will significantly limit what they can farm to restock their resources.
I also like to Ballista THEIR farm in the first attack. This limits what they can train in city to defend, but doesn't limit their support. It can be fairly easily rebuilt, and once you capture, it doesn't limit what support you can get either, if your opponent is a worthy adversary, this is a really good cripple tactic. What doesn't help is Ballista-ing their Forge or City Hall. If their troops are already researched reducing their forge only frees up farm for them to use in defense troops.
- Team up with a guild mate or two. It makes it easier if they get support from their guild mates if you have a reserve supply of troops and a Scholar Train.
- Scout your target and sim your attacks. I can not stress enough how important simulating is. Fwd your scout report to anyone helping you.
- After sending in a cleaning crew, scout again. It's good to have a wave of cavalry in standby to shoot at your victim just in case.
- Keep an eye on it - when ever I assume it's gonna be ok I am always disappointed and usually pissed at the hyjinx your unmonitored troops can get into.
If your prey is dodging troops - hide your troops in a fake ballistic attack. More on that HERE.
OK so you've found your Victim. First thing to do is launch a scout contingency.
 |
| Scholar Report |
If you are confident you can always launch your scholar train first, and send clearing waves timed to land just before your first scholar hits. This can be a gamble with the introduction of the purchasable "truce" option in the store, it is better to have your clearing crew in a city that is further away from your target and slow them down by adding one ram or one sentry to adjust the timing so your cc lands just before your train.
Note the Wall Level is maxed out at 25, You'll need to bring it down to prevent loss of troops. It is quite possible to capture a city completely intact, however for those of us who usually have a need for troops, rebuilding the wall after capture only takes a day or two, depending on how committed you are to it.
Also note at the bottom where he has 250 Lancers outside the city, this maybe support for a guild mate or maybe he is farming, or thinks that they can be brought back into the city just in time to kill your scholar. Make sure that when you simulate you add those units.
 |
| Cleaning Crew Report |
The purpose of a cleaning crew is to kill your victims' troops. Expect your men are to be sacrificed for the greater good of the kingdom, I usually send two waves, the first with Rams and Ballistas to Wall Break your victim and a second wave to mop up the carnage afterward.
Note that I did not send scouts with this wave, mainly because I knew that I would take down the wall completely, aiming my 424 Ballistas at the wall to accompany the rams bringing it to 0. I also knew that my Second CC Wave would be following this wave and I'd get a better picture once I got the report back on that.
 |
| Cleaning Crew Report #2 |
A few things to note, first the time the second clearing crew landed. I timed it so that it would land within 15 minutes of my first attack.
Second, I sent Rams just in case he tried to rebuild his wall or purchased gold to rebuild his wall. I also needed to slow down this clearing crew, adding Rams slows it down considerably. I usually only add 1 Ram if I want to slow down my cc or if I want to disguise it as ballistas. Your victim will leave his troops in city if he thinks you're going to send ballistas to knock down his farm.
I always send MORE troops then actually needed, you collect serious looting, and you can never send too much. I effectively killed all his troops, and his wall is completely down, the path is paved for my scholar train.
 |
| Scholar Report #1 |
Even though the path was clear, I sent a decent contingency to accompany my scholar. If he had a decent guild they would have sent support, and hopefully your first scholar hit lives. I send 4 in a train. This example is based on a 4 Train Cap. I recently got cocky and only sent 4 to cap a city that was a 11 hour walk and got burnt hard because even though my scholars landed within 7 to 10 minutes of one another, I only brought the loyalty down to 2. I had to wait for my scholars to return before I could send more out. LUCKILY I had three extra scholars in reserve so it wasn't that big of a deal, but still. Its better to be safe then sorry.
The more resources you can pull away from your Victim the less he'll be able to build to defend. This guy was clearly not logged on as there was nothing building in queue otherwise you'd see a hand full of whatever troops that is currently building.
Note that my scholar took off 28 loyalty points. Your scholar takes off between 20 - 30 points with each strike, and sending more then one scholar doesn't take off more loyalty, its just a waste. If you have two scholars built in one city, divide up your troops evenly between your two waves.
 |
| Scholar Report #2 |
Note the time. This scholar land is from another of my cities, it landed within 10 minutes of my first scholar, I sent my defense troops to protect my scholar because I used my attack troops in my cleaning crew wave earlier.
Breaking your troops up like this is very effective, you can clear out the troops with your attack troops and protect your scholar easily with a few thousand defense troops. Note: Guardians are very versatile for this reason, they are great for attack and defense.
He still doesn't have any support, which is good for me :) but had he gotten some in between hopefully my contingency would be enough to keep my scholar alive.
My scholar brought the victim's loyalty down from 72 to 45. Because I landed the second scholar so soon after the first, no loyalty built back up between attacks so my scholar took off 27 loyalty points leaving them at 45.
 |
| Scholar Report #3 |
I messed up this land by 10 minutes, because math isn't my strong suit apparently. It still only took 4 scholars to capture this city, so it worked out, but I've had small mistakes like that cost me a cap.
This is another city where I used the attack troops to hit the city then used the defense troops to accompany my scholar. I was confident in my troop count, and I also bet that he wouldn't have support.
The scholar took the loyalty down from 45 to 22 that's only 23 points.
Another really good haul resource wise, leaving him less and less to rebuild with. Clearly he is not doing this as no troops are being built. There's a really good chance that he is going to log into his city in the morning and whoops! Its gone :(
mwahhahahahahaa
 |
| Scholar Report #4 for Capture |
I sent a wave in between the last scholar wave and this one to "sweep" the troops and make sure there were no surprises.
With my claiming scholar I sent Guardians which are a good accompaniment to your scholar. Had i had Bezerkers I would have sent them as well, but I sent them from this city as a sweep to clear out any support troops he could have had.
This final scholar took the loyalty down from 23 to 0 capturing the city as mine and effectively ruining your victim's morning.
That is it, basic capture in a nut shell. If you don't catch your victim while he's offline like in this example, there will be more back and forth, and your scholar death chance increases significantly.
A couple things I like to do to before I engage in war with someone is Ballista the warehouse of nearby barbarian cities. This will significantly limit what they can farm to restock their resources.
I also like to Ballista THEIR farm in the first attack. This limits what they can train in city to defend, but doesn't limit their support. It can be fairly easily rebuilt, and once you capture, it doesn't limit what support you can get either, if your opponent is a worthy adversary, this is a really good cripple tactic. What doesn't help is Ballista-ing their Forge or City Hall. If their troops are already researched reducing their forge only frees up farm for them to use in defense troops.
